This article is the second of a series about designing for your inner landscape | you can read the first part there: What is zone 00 design and why should you start yours?!
I don’t know you, but I personally am an “example person”. I always understand better by getting starry-eyed watching things being done before me or, if that’s all I have to get my teeth into, by dissecting some thorough example of what I’m interested in.
I also am quite into theories and models and stuff (and making visuals out of them!), but sometimes, I find that very complicated concepts would be way more understandable (thus usable) (thus used) if only one had just one (or two) (or three) application examples. After all, whatever we’re doing, we’re doing it with the aim of getting some concrete, material result, aren’t we? So why would we do something we don’t even get the point of?
Well, some would reply “for the fun of it” ; I would argue there’s not so much fun doing something you don’t understand the use of. But maybe that’s just because I spent too much time getting crazy trying to code recursive functions. Who knows.
I think this use for having concrete examples especially applies to zone 00 design; it can seem a bit cloudy at first as a concept, not so much clearer with an explanation of its intricacies, or completely overwhelming — or useless, I guess. Not mentioning the fact that it may sound hard to find where this beginning we’d like to begin at hides!
Because I found it challenging too when I started my own zone 00 design not to have detailed, concrete examples of others’ process and results, I thought it could be useful to you if I succeeded in packing my own experience into some readable thingy you could use for inspiration, support, or anything your permaculture designer mind could come up with.
So here it is: an explanation of the initial steps of my designing for my inner landscape!
Dear you, please excuse the discrepancies in tone along this article ; I have used parts of a report I wrote for my permaculture diploma (recycling in action!), with this more “academic” style that follows. I spent SO much time writing it back then that I absolutely don’t feel like rewriting the whole thing… But let’s hear what past academic-me has to share:
An insight on my initial context

Some years ago, opening my eyes to ecological disasters and systemic oppressions radically changed my life. I focused all my energy and thinking on reframing my lifestyle to fit as best as possible two of permaculture ethics: Earth Care and Setting limits to consumption and population.
However satisfying this practice of getting the most neutral lifestyle possible, it proved also overwhelming. You are never done with adjusting, you can always cut more, and… you have no influence on what others do!
Centering my whole life around doing my best at Earth Care got me into a spiral of erosion: I only saw what was left to do, what “they” didn’t want to do, how quickly death was gaining ground… My entire lifetime was about witnessing from the deepest abyss of despair how powerless I was to make an actual change — whatever I decided to sacrifice.
At some point, it felt like a mostly required step to take to bounce closer to the People Care ethic for a while and focus on myself, stretching the edges of my circle of influence.
After all, when you realise that it’s not a blister that keeps you down but a broken bone, it’s time to take a break and heal yourself.

What design process I chose (and why)
I had decided to use Looby Macanamara’s Design Web to design my inner landscape. This design framework is particularly appropriate for a zone 00 design project as it has been specifically created for that kind of purpose: designing invisible structures and social layers of projects. If you haven’t already, I strongly encourage you to take a look at Looby’s book — it’s awesome.
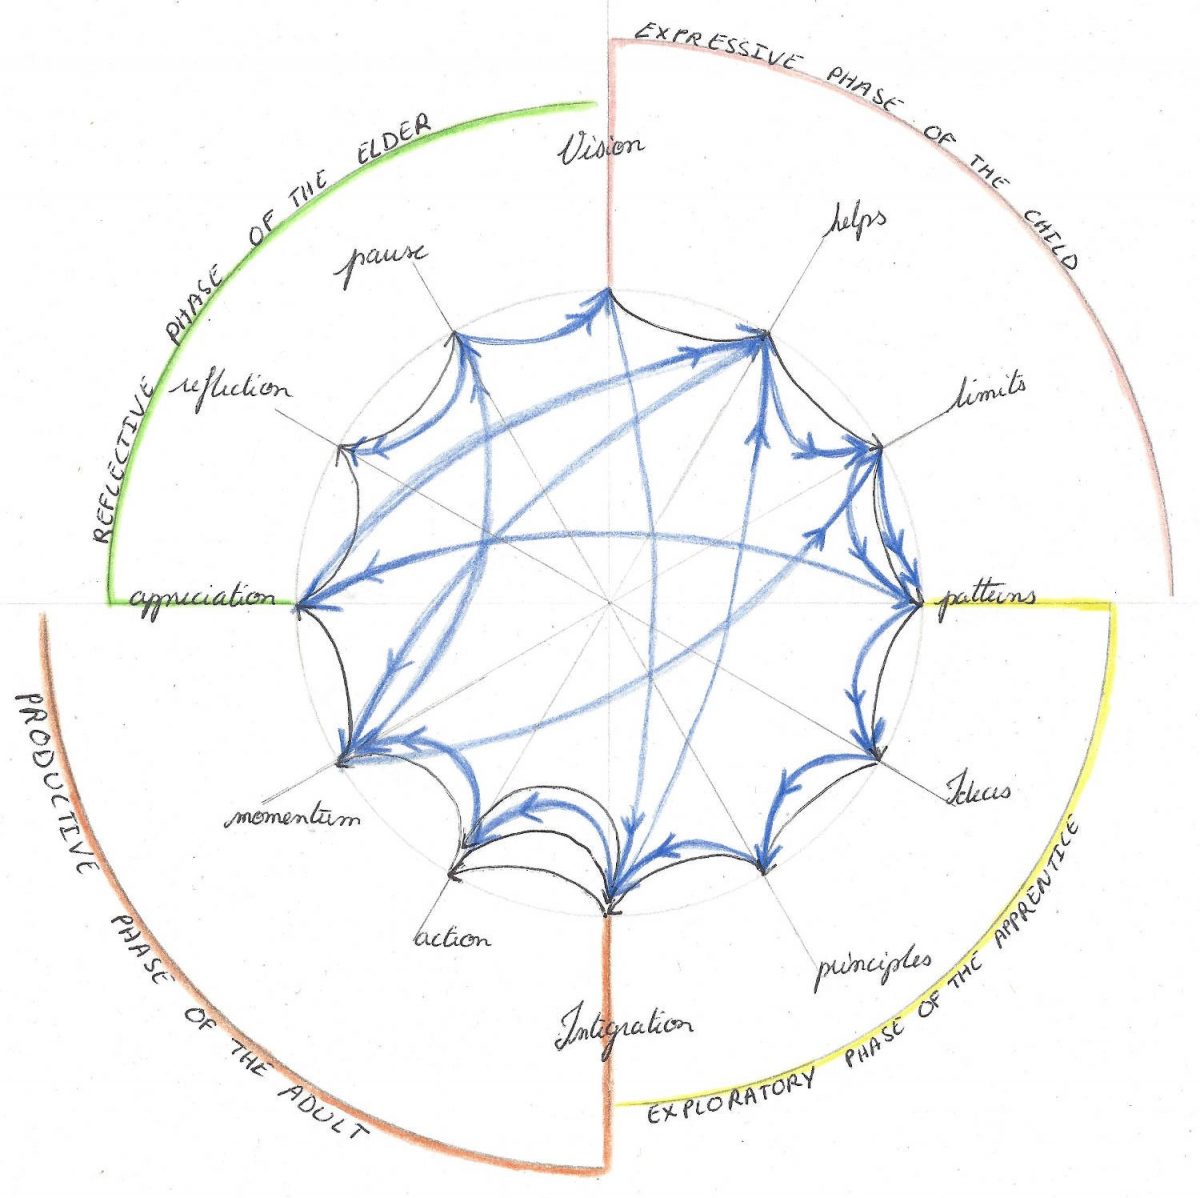
As a non-linear process, it’s possible for the designer to bounce from any anchor point to one another in the design web. Each change to an anchor point changes the balance of the whole design, practically making it a neverending process. Also, as in any web structure, the more connections between anchor points, the stronger the overall structure.
More than just bringing more flexibility to the design process, this web layout also reflects quite well the complexities of our lives, reminding us of the many impacts any seemingly little action can have in unexpected places.
I completed two rounds in the process to get the results displayed in the current article. The two rounds were achieved at a few weeks interval, giving me the opportunity to test assumptions made during the first round and enabling me to move towards deeper dimensions of my vision and goals in the second round.
I did not look back at my previous results before diving into the second round, the aim being to see whether I could come up with different/new results from the first time.
For the first round, I went clockwise around the Design Web, starting from the Vision anchor point. The second round was done in a more random order and some anchor points were visited several times (see picture below), making the web more dense.

What were my intentions for this design
As a client — that is, the main beneficiary of the design — my goal with this project was to focus on the notion of personal empowerment to become a proficient permaculture designer — and improve my quality of life.
As a designer, I wanted to get to grips with designing invisible structures, applying a variety of models and tools to this somewhat “abstract” and not-so-well-illustrated-out-there field of permaculture design.
These goals and the specific context I was in shaped my design work and choice of tools — your own will probably look way different.
Some activities I undertook
Below you can find a brief overview of the different methods I have used through the design process, grouped by quarters.
The whole design process was articulated around the permaculture principle of “Obtain a yield” — as obtaining a yield is the best way to build momentum and keep going!
Directions given by Looby Macnamara in her book People & Permaculture were my main source of inspiration for completing this work.
The expressive phase of the child
Vision.
- brainstormed ideas answering the question “what’s my vision for myself?”
- generated some kind of wish-list of traits and emotions
- listed fictional characters who inspire me
- present tense active voice visioning
- set a milestone for achieving my vision
- answered Looby’s suggested questions: what abundances do I want to create? Who’s my ideal self? Where do I want to be?
Helps.
- listing of inner assets/successful experiences of the past that could be used in present situation
- answered the question: what are my motivations for change?
Limits.
- listing of things I’d like to change or let go of — fears, concerns, habits
- listing of “limiting” needs
“Just becoming aware of the unmet need can help to fill the gap at times” [Looby Macnamara — People & Permaculture]
The exploratory phase of the apprentice
Patterns.
- description/detailed steps of spirals of erosion & spirals of abundance
- new patterns of thinking I’d like to develop
- models from other successful areas
Ideas.
- stored ideas as they came up through the process
- notes of insights from readings and listening to podcasts and videos, inspiration from outside resources, questions to think about
Principles.
- journaled around each of DH’s 12 principles in relation to “me, myself and I”
- chose an anchor principle for the whole design: Obtain a yield
“The reinforcing loop going downward, which said “the worse things get, the worse I’m going to let them get,” becomes a reinforcing loop going upward: “The better things get, the harder I’m going to work to make them even better.” [Donella H. Meadows — Thinking in Sytems]
The productive phase of the adult
Integration.
- analysis of biotime diary + initial survey of time use and diet → Identified key periods + functional patterns
- decomposed vision into needs → use of different needs models for help and inspiration (M.B. Rosenberg’s, Max-Neef’s)
- broke down meta needs into smaller needs
- listing of possible systems for addressing the needs
- analysed links amongst the needs
- analysed links amongst the systems
- list of needs with potential systems to meet them
- list of potential systems with the needs they fulfil
- blobbed needs related to each others to visualise traction and yields
- inputs/outputs analysis
- hierarchy of needs
Action.
- list of actions by priority (important + fastest biggest yield) with initial plan (SMARTER goals)
- review of list & update according to results from prototyping
Momentum.
- set milestones
- keep up with tracking and journaling
- looked for achievements to keep me going
- settled seasonal revision of present design for updates and further implementation
The reflective phase of the elder
Appreciation.
- wrote a list of gratitude to myself
- drew a river of life focused on positive events only
Reflection.
- the productive phase of the adult is the most problematic to me. I lacked clarity in the integration phase, from chunking big needs/systems/whatever in smaller pieces to the exhaustiveness of the different analysis. Difficulties too to plan in the long term, schedule milestones and maintain momentum.
- the results of the designing process from one round to the next proved different as main concerns of the first round were mainly addressed in the meantime by prototyping solutions. Addressing the first layer of concerns left room for deepening of process.
Pause.
- reminder to manage time use according to weather for outside activities and rest & to include recreational time — which means activities with no expected outcome.
Merging the rounds
After going through the 2 rounds, I went back the whole process again and highlighted everything that looked like major insights from both design iterations and altered the design accordingly (mainly Integration & Action anchor points).
I also complemented my initial work by additional thinking sparked off the concurrent reading of both iterations.
You can get an overview of the changes I made to my routines and their outcomes in the mindmap below — things have kept moving since then so this chart does not reflect my reality anymore.

The harvest
As of finishing this initial development of the design, I had already gained a better understanding of myself, of my deep rooting into different natural cycles that have a strong influence on me and that I can use to my advantage.
The design process itself as well as the solutions prototyping done increased my self-esteem, marked out the path to new projects and grew new motivations to keep on going. It also made me more confident about moving towards action (instead of staying trapped in the thinking) and helped me gain momentum for upcoming projects.
It too enabled raising awareness of the importance of seasons and sunlight in my functional patterns.
I had noticed improvements in the area of productivity and actioning my powers to reach my goals.
I also had identified specific areas for improvement to explore during the following months.
Key learnings
Were these good design choices?
It was really helpful to start that work with a framework with detailed steps to follow and lots of insights provided as to how to use it.
Going through several design rounds helped me deepen my understanding and use of the different tools available.
Including more diversity in the design methods used would have been beneficial to broaden the range of outcomes and reflections on process.
What went well?
Three quarters of the Design Web only require observation and simple components analysis capacities, which went well as I am used to introspection and self reflection.
What was difficult?
The productive phase of the adult, where the design work is about deep analysis and creating beneficial connections between the different components was the most difficult part for me — and it shows well on the drawing: these anchors have the most connections! Given this habit of mine to stay stuck into the reflective phase and not moving into action, these activities required extra efforts and reflection.
Difficult and time consuming was also to chunk meta needs in smaller actionable items — practise helps a lot there.
The Integration anchor point was the most time consuming — that’s where the design emerges.
It was only when being stuck in the Momentum anchor point that I realised I couldn’t move forward because the previous steps weren’t clear enough.
An interesting un/learning from this initial design project was that of letting go of precise expectations to focus on general guidelines, trust the process and train to embrace whatever emerges.
What would I do differently next time?
I will, as this design will continue to evolve in time, use various design methods in each anchor point to develop my tool belt, understand better my way of thinking and analysing as well as discovering what kind of tools suit me best. I hope this diversification will help to bring up new insights and perspectives.
Then what?
Back to non-academic me speaking!
Following this initial design work, I kept on documenting my biotime diary, journaling and seasonnally updated my path. These seasonal updates were very useful to analyse more precisely my own functioning related to weather, temperatures, length of daytime, quantity of sun light received, etc. I initially planned to do another round into the design process at the end of each season, but didn’t feel like I had enough new material (and practical experience of my new design) to do so. I thus had an annual new round in the process, for which I used the new insights and documentation harvested along the past year.
This inner landscape design as presented here was the second one on my Permaculture Diploma path. I didn’t have much practical experience in applying any design process, tool or model back then. Of course, it was difficult, sometimes. Of course, it felt overwhelming, often. But sticking to it, coming back to weave more of it over and over again was just so incredibly rewarding!
I hope this presentation of my own path inspired you to take that journey of designing your inner landscape for yourself. I strongly encourage you to dare to challenge your own status quo. Your fears, as well.
You don’t need a whole lot of design experience to get going. The only required thing is to gather up your curiosity, excitement, honesty and will to change. Because that’s the thing: just starting to observe your inner landscape under the lens of permaculture design will affect it. And that’s what you are looking for.
So before diving into this potentially life changing exercise, just take a few moments to agree with yourself: you are inviting change in. And you’ll greet it arms wide open.
What about you now: how do you feel about it? Do you feel clearer and more motivated to start your own inner landscape design? What would you have liked to learn about earlier?


